Getting Started with PEBL Online Platform
Quick Summary: Learn how to create your first study, select tests, and start collecting data online.
What You'll Learn
- How to log in and navigate the platform
- Creating your first research study
- Selecting and configuring tests
- Sharing study links with participants
- Accessing your data
Video Tutorial
Before diving into the step-by-step guide, we recommend watching this 13-minute overview video that demonstrates the entire PEBL Hub workflow:
Watch on YouTube: PEBL Hub Overview (13 minutes)
The video covers:
- Platform navigation and interface overview
- Creating and configuring studies
- Adding tests and customizing parameters
- Generating participant links
- Viewing and downloading data
- Best practices and tips
Overview
The PEBL Online Platform enables researchers to run Psychology Experiment Building Language (PEBL) tests entirely in participants' web browsers. No software installation required for participants—just send them a link!
This guide will walk you through creating your first study in about 10 minutes.
Step-by-Step Guide
Step 1: Log In
- Navigate to your PEBL Online Platform URL (provided by your administrator)
- Click Login in the top-right corner
- Enter your researcher credentials
- Click Sign In
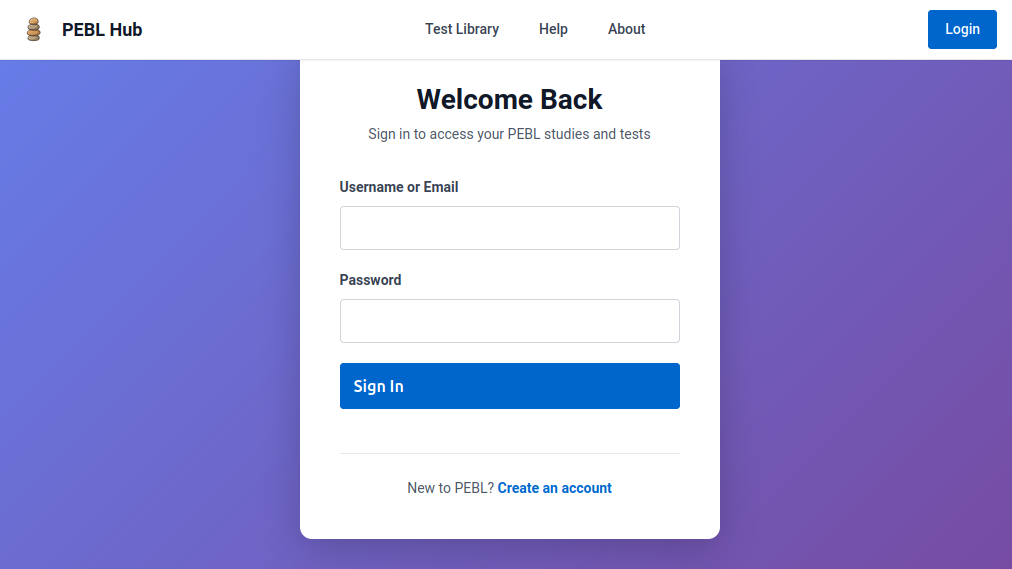
Figure 1: The login page. Click the "Login" button in the top-right corner to access the researcher interface.
First time? Contact your administrator for an account. The platform supports different subscription tiers with varying features and test access.
Step 2: Create a New Study
- From the dashboard, click My Research Studies
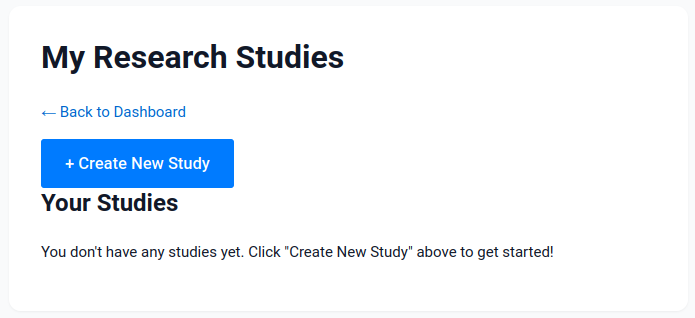
Figure 2: The My Research Studies page. Click the "Create New Study" button to begin setting up your first study.
- Click the Create New Study button
- Fill in the study details:
- Study Name: Descriptive name (e.g., "Spatial Memory Pilot Study")
- Expiration Date: When the study should close (optional)
- Max Participants: Limit on number of participants (optional)
- Test Selection: Select any of the tests you want available in this study (availability and number you can add may depend on account type)
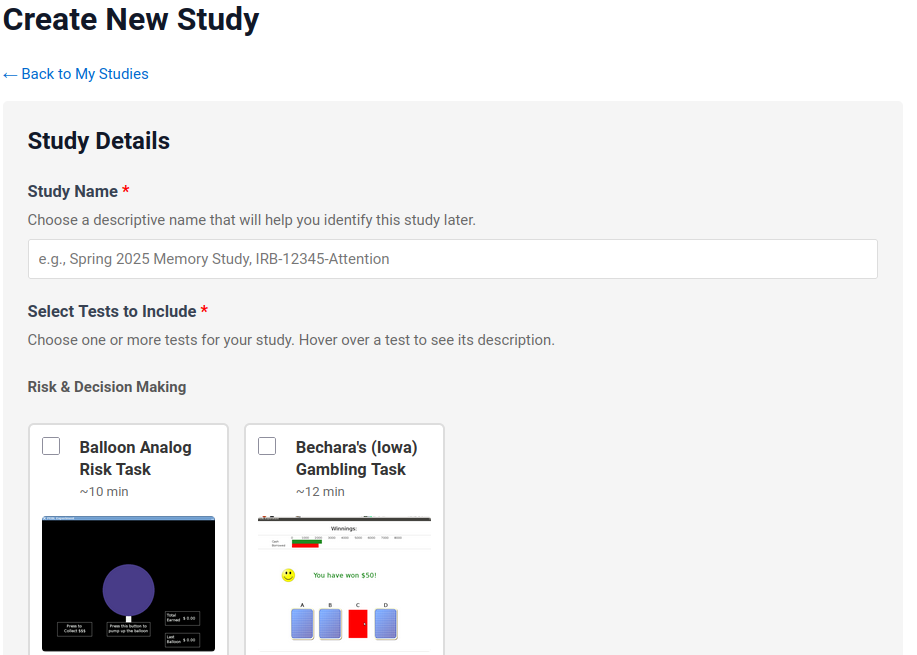
Figure 3: The Create Study form (top section). Enter a descriptive study name and select the tests you want to include in your study.
After scrolling through the test selection, you'll see additional options at the bottom:
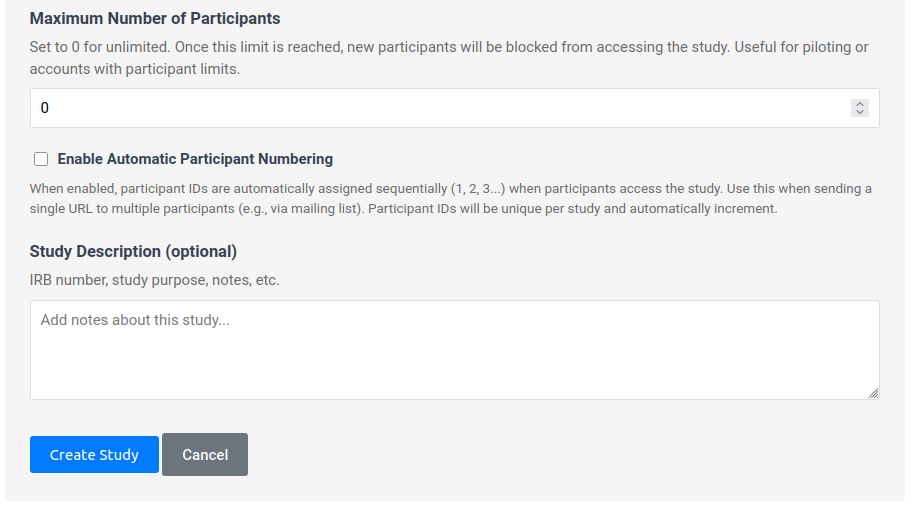
Figure 3b: The Create Study form (bottom section). Set maximum participants, enable automatic participant numbering, and add an optional study description. Click "Create Study" when ready.
- Click Create Study
Step 3: Access Your Studies directly
After creating your study, click on the Studies menu option at the top of the page. This will take you to a list of your available studies. This is used for managing individual studies, simple integration of individual tests into other platforms, and recruitment via email or other non-tracked participant pools. More complex integrations are available in the Test Chains tab.
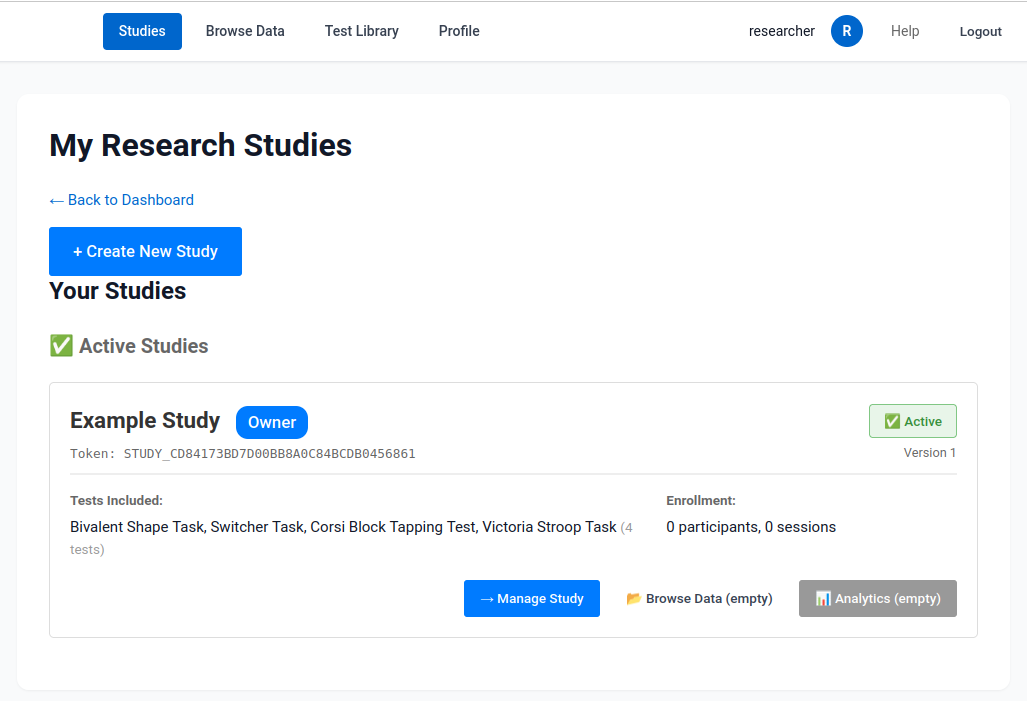
Figure 4: Your study list showing your newly created study. The study is marked as "Active" and shows the included tests and enrollment count. Click the "Manage Study" button to configure and manage your study.
Click the Manage Study button to access your new study's management page.
Step 4: Configure Study Options
On the study management page, you'll see three tabs:

Figure 5: The study management page with three tabs for different ways to configure your study.
Individual Tests Tab
Single tests that participants can take independently. Each test gets its own unique URL that you can share directly.
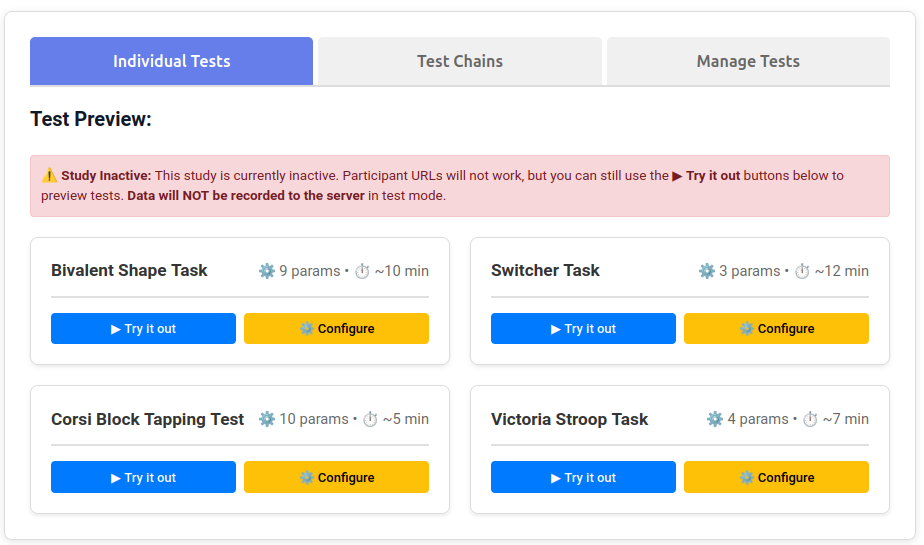
Figure 6: The Individual Tests tab displays tests that have been added to the study. Each test card shows the test name, number of configurable parameters, and estimated duration.
Use when: You want participants to complete one specific test, or you want to distribute different test URLs to different participant groups.
What you can do:
- Browse the tests you added to the study
- Click ▶ Try it out to preview an abbreviated version of any test
- View test parameters (⚙️) and estimated duration (⏱️) for each test
- Get participant URLs for individual tests (covered in Step 5)
For your first study, start with this tab.
Test Chains Tab
Sequences of multiple tests combined with instructions, consent forms, and debriefing pages. Chains create a single URL that guides participants through multiple tests in order, with automatic progress saving.
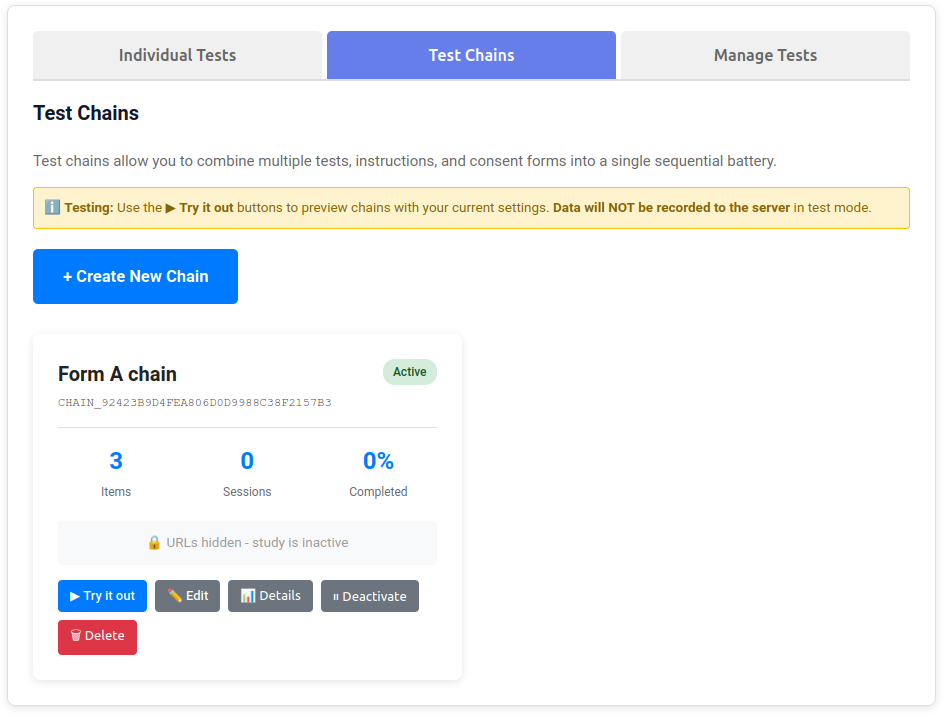
Figure 7: The Test Chains tab where you can create and manage test batteries. Each chain shows the number of items, sessions completed, and completion rate.
Use when: You need participants to complete multiple tests in a specific order, or you need to include consent forms and instructions as part of the study flow.
Learn more: See Creating Test Chains for detailed instructions on building test batteries.
Manage Tests Tab
Add or remove tests from your study. Tests must be added here before they appear in the Individual Tests or Test Chains tabs.
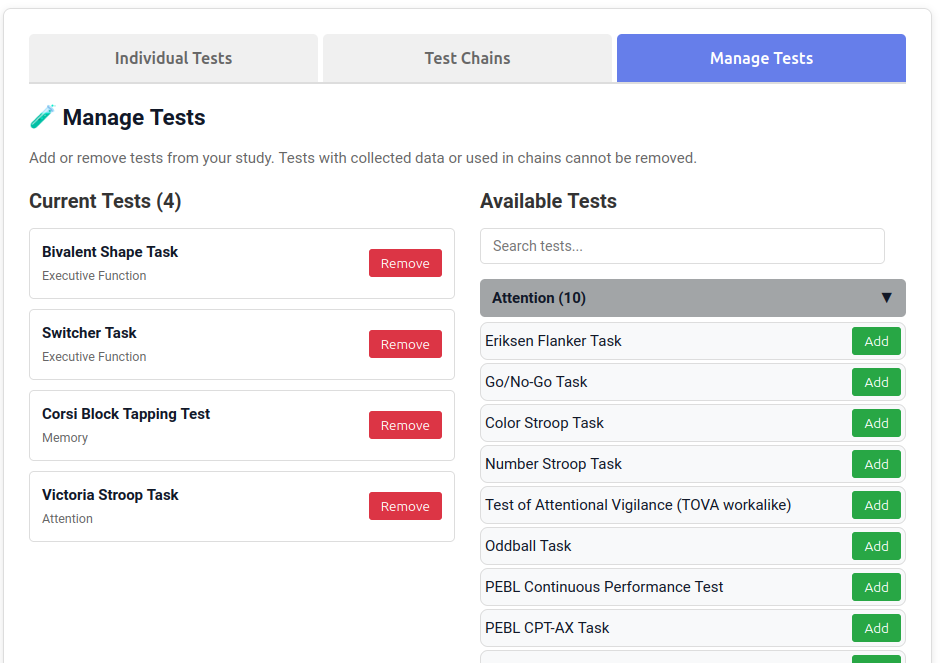
Figure 8: The Manage Tests tab displays your current tests and allows you to add additional tests from the available library or remove tests you no longer need.
Use when: You want to add more tests to an existing study, or remove tests you no longer need.
Note: You cannot remove tests that are already used in test chains or have collected data.
Step 5: Get Participant Links
Each test shows a production URL. You have two options for participant IDs:
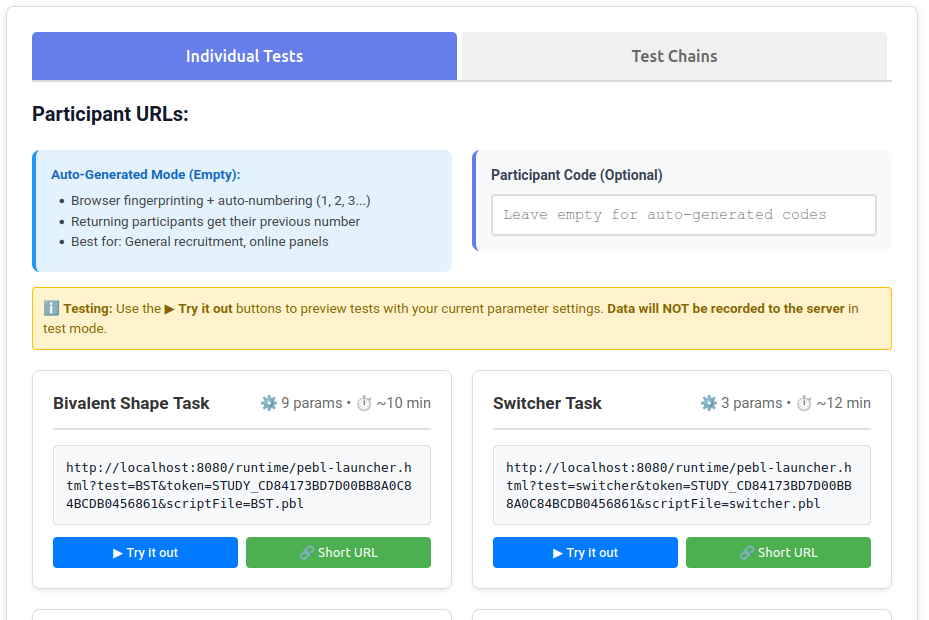
Figure 9: Each test displays a production URL along with buttons for generating short URLs and testing. Enter a participant code or leave empty for auto-generated codes.
Option A: Auto-Generate Codes (Recommended for most studies)
- Leave the Participant Code box empty
- Copy the URL or click 🔗 Short URL to generate a memorable short link
- Share the URL with participants via email, flyers, or your recruitment platform
Option B: Manual Participant Codes
- Enter a specific code in the Participant Code box (e.g., "SUBJ001")
- The URL updates to include that code
- Click 🔗 Short URL to generate a unique short link for that participant
- Repeat for each participant with different codes
Other participant management schemes:
More sophisticated participant code schemes are available with test chains, which allow multiple pages and platform Integration (Prolific, MTurk, etc.). Platform Integration.
Step 6: Configure Test Parameters (Optional)
Each test has configurable parameters (timing, difficulty, trial counts, etc.):
- Click ⚙️ Configure next to a test
- Adjust parameters as needed:
- Enable/disable practice trials
- Modify timing (ISI, ITI, timeouts)
- Change trial counts
- Adjust difficulty settings
- Click 💾 Save Configuration
For details, see Configuring Test Parameters.
Step 7: Test Your Study
Before recruiting participants:
- Click ▶ Try it out next to a test URL
- Complete the test yourself to verify:
- Instructions are clear
- Timing feels appropriate
- Test functions correctly
- Data uploads successfully
- Check your data appeared in Browse Data (main menu)
Step 8: Recruit Participants
Once you've tested everything:
- Activate your study (if it was created as inactive)
- Distribute the participant links via:
- Email invitations
- Recruitment platforms (Prolific, MTurk, SONA)
- QR codes on printed flyers
- Links on your website
- Monitor participation in Study Analytics (accessible from your study list)
Step 9: Access Your Data
To view and download data:
- Go to Browse Data in the main menu
- Select your study from the list
- View summary statistics and participant progress
- Click Download Data to get CSV files for analysis
- Raw trial-by-trial data
- Summary files
- Metadata (timestamps, test version, parameters used)
Common First-Time Questions
Does PEBL Online run the tests off of a server?
No! PEBL is compiled into a form called webassembly. It requires downloading a package of data into the web browser's protected storage system, and running the test completely locally, and even saving data files into the web browser's local persistent file storage. At the end of the test, the PEBL executable uploads the data files to our server for access, but you can also have participants upload or email them to you directly using setup links in the public test library.
Do participants need to install anything?
No! Everything runs in the web browser. Participants just need:
- Modern web browser (Chrome, Firefox, Safari, Edge)
- Internet connection
- JavaScript enabled (default in all browsers)
- PEBL runs in the browser, and has no direct access to the user's file system.
Can participants pause and resume?
Test chains (batteries): Yes, progress is automatically saved. If a participant closes their browser, they can return to the same URL and pick up where they left off.
Single tests: Must be completed in one sitting (typically 5-15 minutes).
What if a test doesn't work for a participant?
Common solutions:
- Make sure they're using a modern browser (not Internet Explorer)
- Try a different browser
- Check that they have JavaScript enabled
- Ensure stable internet connection
For persistent issues, see Troubleshooting.
How do I handle informed consent?
For test chains: Add a consent form as the first item in your chain
For single tests: Include consent in your recruitment materials or survey platform (if using Qualtrics, SurveyMonkey, etc.)
Always follow your institution's IRB/ethics board requirements.
Next Steps
Now that you've created your first study:
- Create Test Chains - Build batteries with multiple tests, instructions, and consent forms
- Configure Test Parameters - Fine-tune test behavior for your research questions
- Platform Integration - Connect with Prolific, MTurk, SONA, or Qualtrics
- Short URLs - Generate memorable links for easy distribution
- Understanding Subscription Tiers - Learn about features available at different tiers
Best Practices
1. Always Pilot Test
Run through your entire study as a participant before recruiting. Catch issues early!
2. Keep URLs Safe
Don't post study URLs publicly where unauthorized people might access them. Each study uses data storage and may have associated costs.
3. Monitor Analytics
Check your study analytics regularly to:
- Detect technical issues (high abandonment rates)
- Track recruitment progress
- Identify problematic tests
4. Document Your Configuration
Keep notes on:
- Which parameter values you used
- Why you changed defaults
- Any issues encountered during data collection
5. Download Data Regularly
Don't wait until the study ends. Download data periodically as a backup.
Troubleshooting
I can't see any tests
Causes:
- Your account may not be activated yet
- Your subscription tier may not include test access
- Tests may be restricted based on your tier
Solution: Contact your administrator to verify your account status and tier.
Participant URLs don't work
Causes:
- Study may be inactive
- URL may be malformed (check for extra characters)
- Platform may be undergoing maintenance
Solution: Try the "Try it out" button first. If that works but participants can't access it, check your study's active status.
Data isn't appearing
Causes:
- Study token may be incorrect
- Upload system may have errors
- Participant may not have completed the test
Solution: Test the URL yourself and check the browser console (F12) for error messages during upload.
Getting Help
Documentation: Browse other help topics in this help system for detailed guides on specific features.
Technical Support: Contact your platform administrator or submit an issue through your institution's support system.
PEBL Community: For questions about specific tests or PEBL functionality, visit the PEBL website and mailing list.
Need more help? See the related topics above or browse the Help Index for all available documentation.